Friday 27 January 2017

How to Create the Film Grain Look Using PhotoDirector

Processing photos to make them as if they were shot from film is getting popular nowadays, because they do add some character to the photograph. In this tutorial, I’ll show you a quick way to emulate that film grain look to your digital photos.

Film grain or granularity is the random optical texture that appears on film and it is a result from the film development process. Film grain differs in appearances. Films with higher ISO generate larger or rougher grains on the image while lower ISO creates smaller and finer grains. 

Film grain effect is most popular when processing B&W photos, so Let’s start by converting this portrait to black and white by using the one of the B&W-Platinum preset in PhotoDirector.

Keep in mind there are several ways to convert color images to black and white in PhotoDirector. You can do it manually, and we have a previous article that teaches you how. http://create-n-play.blogspot.tw/2014/05/converting-photos-to-black-and-white.html

Using the preset is a quick way to get an effect, but you can make further adjustments. The result of the preset is on the brighter side, I think it needs to tone down a bit and contrast boost to emulate photographs processed from films. Here are the quick edits and its result:

At this time, you can do portrait retouch using the tools in the Edit module to touch up your portrait. Here is another tutorial that goes through some the major tools [link]. But for this photo, I didn’t think it was necessary.

Now that we have a good black and white image to work with, go to the Edit Module and select Grain Effect.

PhotoDirector provides several adjustment controls to create the grain look you want. Enlarge your photo while adjusting the Grain Tools, you will see the effects more clearly.

1. Amount: decides how grainy you want the image to be.

2. Size: As mentioned, the higher the ISO the larger the grain size. In this picture, I opted for a lower size because the overall image is fairly bright. If this we a night shot, I would select a bigger size.

3. Feature and strength lets you adjust intensity of the grain look.

4. There is also an eraser to wipe out areas you do not want the grain effect.

Here is the final image comparing with the Black and White versions, adding grain effect does add a nice texture on the photo. (The image on the left with Grain Effect applied)


Here is an enlarged comparison:


You can also add grain effect to color images too. First step to is adjust tonality of the image to give it a vintage look.

Then add the Grain Effect:

If you are after the retro or vintage look for your photos, try applying the Grain Effect. It just adds so much texture to you image.

If you are new to PhotoDirector, learn more and download a 30-day free trial here.


Friday 30 December 2016

3 Ways to Use the Fisheye Lens Effect in PhotoDirector Mobile

The Fisheye lens in PhotoDirector Mobile gives images the super-wide spherical look and an interesting effect for the picture. Though the images will be distorted by simulating a wide-angle view, but you can take it to your advantage. Here are 3 examples, taking bland images to create something different.
1. Cutify your Pet and Kids with Fisheye lens effect


2. Call for attention, exaggerate the subject


3. Look slimmer. Yes, because smart phone lens tend to distort your face, especially when you are holding the camera close to your face. You can restore that photo by using the Fisheye lens effect.


Using the Fisheye Lens is really very easy. First import the image into PhotoDirector Mobile
Next Find the Fisheye Lens button and click to enter the effect interface.


In the Fisheye Lens Effect interface, there is a slider below your photo.
Slide to the right to make the center of the photo bigger, closer and exaggerated.
Slide to the left to make the center move away from you.
  1. This is the compare button for easy Before and After preview
  2. Click on the Check to save this effect
  3. The help button provides useful guides in using the software


PhotoDirector Mobile will direct you to the main interface where you can further edit your image by applying other effects.
  1. This is the compare button for easy Before and After preview
  2. Click on these buttons to undo and redo
  3. Click on the Save button to save your image and share to social networks


Keep in mind that the Fisheye Lens Effect is applied in the center of the photo, so before applying this effect, you may want to use the crop tool to make sure the face or subject lies in the center of the image. Now, try finding some pictures and try this fun tool.

Don't have PhotoDirector Mobile? Get it Now.
Available for Apple, Android and Windows devices.


Friday 28 October 2016

Create an Inspirational Quote Picture with PhotoDirector Mobile

Every now and then, we need inspirations to give us a boost and remind us that life is beautiful. I find all those visual quotes on Instagram or Tumblr to be inspiring and witty at time, and most of it they really make my day.


You can create such beautiful inspirations too with PhotoDirector Mobile, the new Text feature is easy yet customizable in unlimited ways. In ths tutorial, we will guide you to a few simple steps to create an inspirational quote image.

Start by importing a photo into PhotoDirector and Click on the "Text" icon.


There are two types of "Text" functions. In this tutorial, we will be using the regular text feature.


A text input box will appear where you can type in the quote. Note that there are several adjustments tools to customize the text:
  1. Font style: Bold or Italic
  2. Alignment: right, left or center
  3. Font type: there is a variety to choose from and also downloadable ones. All for free.
  4. Font color: color of the text, border and shadow with opacity sliders for each adjustment.


Click on Font Type and the options will be listed for easy selection


Click on Color and start by choosing font type color, then shadow of border. In this tutorial example, I have chosen colors that has more contrast with the background image, plus a drop shadow in darker color. Shadows and borders bring more contrast and make your text more easy to read.


Repeat the steps above to add more text using different font type or color.But you may use a consistent font type or color throughout. 
  1. Click this button to compare before and after
  2. Click on this button to roll back. You can use this feature to roll back several steps.
  3. Click on this button to save and share your quote picture.


More examples below:

Add a few strokes of Magic brush in the Pen Tools

  
Use different type face and colors too

  
Add a frame to finish the look


Now it's your turn to create some quote pictures. They make wonderful inspirations to light up the day or great gifts to send to friends.

Don't have PhotoDirector Mobile? Get it Now.
Available for Apple, Android and Windows devices.


Friday 30 September 2016

How to Create a Daguerreotype Effect using PhotoDirector

There is something to admire about old photographs - their scratched surfaces, torn edges, tint color stains. Though most of us do not have the dark rooms of the old days, not to mention a film camera, using software to make digital photos look like as if they were shot from film cameras is quite popular nowadays. Earlier this year Lomography has gone even further by launching a Kickstarter campaign to fund its production of the Daguerreotype Lens for modern cameras. The Lens aims at bringing back the look from Daguerreotype processed images - the first publicly announced photographic process in the history of photography, invented by Louis Jacques Mande Daguerre in 1839.

Each daguerreotype is developed with a complex process on a silvered copper plate producing a unique aesthetic look. Thanks to today’s technology, we can bring back many of its characteristics found in the Daguerreotype image just by using PhotoDirector. In this tutorial, we’ll show you how.

Step 1: Select an image

Back in the 19th century, the daguerreotype images were taken with long exposures, so if there are clouds or water in your photo, make sure they are blurred with movement. If there are people in the street, make sure they are eliminated. If you select a portrait, make sure the person is in a position that can be stable for at least 30 minutes. Yes, that was how long a photo was taken back in the days. No wonder, portraits had a solemn look, and in a sitting position. They simply can’t move much or the whole picture will be blurred.

So, if you are to shoot your image and emulate the daguerreotype, make sure to take long exposure images. In this tutorial, we will use the image of a portrait taken from a modern camera. 

Step 2: Convert to Black and White

There is more than one way to convert a color photo into Black and White. There is another tutorial for this topic. In this example, I de-saturated the image and made further adjustment to the highlight, shadows and midtones to darken the overall look. The photo also looked too sharp so the Clarity is dialed down too.

Before moving to the next step, I find the dimension of this photo doesn’t seem right, most old photos use a 4x5 ratio. By using the Crop tool, the image can be easily adjusted to the desired ratio.


Step 3: Add texture

There are lots of free texture images on the Internet. Google search “scratched metal texture” and you will come up with some pretty cool sites that offer texture images for free. Make sure you read the guidelines and instructions so you do not infringe copyright.

I downloaded a couple of texture files from the websites below. They offer some for free.
https://lostandtaken.com/downloads/category/scratched/
https://www.flickr.com/photos/41043877@N06/albums/72157623352208482

In this image, I applied 2 layers of texture, one for its scratch and blue tint and the other for its ragged borders and warm tint. To apply the texture:
  1. Go to the Layers module
  2. Import the first texture file 
  3. Change the Blend mode to Overlay
  4. Re-size, rotate or flip the texture image by using the buttons in the upper right corner


Step 5: Border treatment
One of the texture layer had a nice ragged border, however, it was not dark enough. You can adjust tonality of the texture file by clicking on the adjustment button and the “Adjust Panel” will appear.


Now, I change the Blend mode for this layer to “Multiply” in order to get the ragged border look. And by using the Eraser brush to remove the yellowish parts that is covering the face. I chose a medium opacity so the transition is much gradual.


Lastly, go to the Adjustment Module to add a vignette using the Radial function. The Radial function gives you an off-center vignette. Dial down the exposure and the borders will darken.


Here is the Before and After (Modern and Vintage) variation of the photo:

Another example with a Before and After editing to create a Daguerreotype effect.

Now try this effect on your photos. You can also try a landscape image too.

If you are new to PhotoDirector, learn more and download a 30-day free trial here.  For technical support via email, contact louis_chen@cyberlink.com


NOTE: CyberLink reserves the right to share your personal information with third parties. CyberLink is not responsible for damages to hardware or lost data. By using CyberLink software, you agree to waive your rights as a consumer. 


Friday 26 August 2016

Creative Effects Using the Linear and Brush Blur Tool in PhotoDirector

Sometimes a blurring part of your photo creates a unique atmosphere or emotion to your photographs. Yes, not everything has to be tact sharp. Further to our previous tutorial on creating the Circular Blur effect, in this tutorial, we will explore the Linear and Brush Tools.


The Linear Blur Tool is located in the Edit Module. 

There are 3 major types to choose from - Circular, Linear, and Brush. In this tutorial, let’s start with the “Linear” Blur.

The Linear Blur creates a miniature or toy effect one usually gets from an expensive shift-and-tilt lens. When you click on the Linear Blur Tool, a set of gradient lines will appear on your image. The middle section (1) is where the focal will be and this part of the image will remain sharp and intact. The outer areas (2) are the gradient range from being sharp and focused to blurred. Areas outside the gradient lines (3) will be completely blurred and you can adjust the amount of blur using the slider (4).


So, the first step is to decide to focal subject in the picture and adjust where you want to put the blur gradient and adjust the width. In the side panel, there are 2 Blur Type options – Soft focus, and Bokeh.
 

When applying the Blur effect, there are a couple of helpful tools:
  1. A slider to adjust the intensity of the blur effect according to your preferred look.
  2. A convenient check box to hide the gradient lines so you can preview the adjusted photo.
  3. You can also use the “Compare” mode to see the images before and after applying the blur effect.
You can also turn the gradient tool to an angle. By mouse-over the center line, an arched arrow will appear indicating you can adjust the angle.
With the Soft Focus, you can instantly get the toy or miniature effect. Here is the Before and After images side by side.
Bokeh adds flavor to the blur and it comes with 4 different shapes.
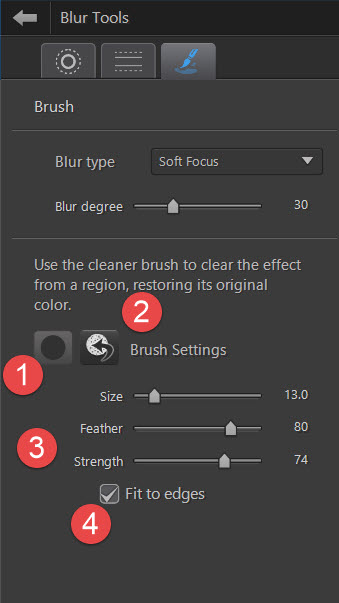
The Brush Blur Tool gives you more control over which area you want to blur. When you click on the Brush Blur Tool, you will notice that the entire image is blurred and a brush is ready to wipe out any area that you don’t want to be blurred.
You can set the size, feather and intensity of the brush on the left panel.
In addition, PhotoDirector gives you two types of blur effect – Soft focus and Bokeh. And like the Linear and Circular Blur, you have 4 different bokeh shapes.
In this tutorial, the aim is to retain focus on the sunflower, and keeping the center sharp.
  1. Use this brush to recover focus
  2. Use this eraser brush to blur
  3. Select Fit Edge to apply blur on areas of the photo with similar properties. Check the box to restrict blur effect from on the flower and retain blur in the background.
  4. You can adjust brush size, feather and intensity with these sliders. A quicker way to adjust brush size is by mouse scrolls.
                           
I used a recovery sponge with 100% intensity to keep the center sharp and in focus.
Reduced the intensity to 70%, bigger feather and constantly adjusting the brush size to wipe on the petals. I kept the edges of the petals blurred to give it a motion effect,a s if the petals were moving from the wind. 
Here to compare the Before and After editing of the image: 
Now, it’s your turn. Try applying the Blur Tool to your images and share your art.
If you are new to PhotoDirector, learn more and download a 30-day free trial hereFor technical support via email, contact louis_chen@cyberlink.com


NOTE: CyberLink reserves the right to share your personal information with third parties. CyberLink is not responsible for damages to hardware or lost data. By using CyberLink software, you agree to waive your rights as a consumer. 

Friday 29 July 2016

Fix Backlight Problems in 30 Seconds using PhotoDirector

Backlighting is a common photo editing problem. There is a loss of detail due to strong back-lighting and when camera exposes for the brightest part of the background, the foreground subject turns into a silhouette. This can happen photographing any subject - portrait, wildlife, architecture, and so on. Fortunately, this problem can be easily fixed to restore the details and in this tutorial, we will show you how by in a few quick steps using PhotoDirector.

The sample photo is an image of an owl, as you can see the camera is exposed to retain the color of the sky hence the owl is overly dark.


Simply move the Dark slider to brighten up the owl and darken the Bright. The owl has brighten up yet the color of the sky is retained.


Next, you can add some contrast to the image by adjusting the Contrast and Clarity slider. Clarity brings more definition to the mid-tone areas.


Next to sharpen the image even more, use adjust the Sharpen slider.


Use the Edge Mask slider to sharpen on the edge. By pressing down ALT and Edge Masker slider, the image will turn into Black and White. The white parts indicate the edge detected and sharpening will only be applied in those areas.


Next, 2 graduated filters are applied to darken the bottom part of the image. This is done by adjusting the exposure to the graduated filter.


and adding a subtle saturation adjustment to Blue when applying the Graduated Filter on the top.

And here is the Before and After Images to compare the result.


So, there, PhotoDirector is a smart tool that lets you brighten up dark areas without blowing out the highlights.

If you are new to PhotoDirector, learn more and download a 30-day free trial here. For technical support via email, contact louis_chen@cyberlink.com